
How to Use the Xargon Level Editor
Author: Allen W. Pilgrim
Date: April 1, 2024
Contributions by: Brandon Pilgrim, John Brandon, Harvey Patterson
General Information
- The Xargon Level Editor is useful for creating your own customized levels. It is the original tool that I used to create the levels in the game.
- You will need to have a copy of Xargon that has the in-game Level Editor enabled. I have released this version for public use on April 1, 2024.
- At the end of the instructions are the resources you will need to edit your levels.
- The Level Editor is substantial and has hundreds of settings, not all of which are included in this document. I will do my best to help provide more information as needed. Then this documentation can be updated to reflect any new information.
- I created a simplified map so you can easily load every level and even create your own checkpoints to load your own levels. Load MAPO to see the original map.
- I also included a new level that I created specifically for this release.
- The full version of Xargon (1994) is now available as freeware and I have included the entire game for your enjoyment in a subfolder named "Original Files." Make sure to keep an unedited copy so you can go back to the original version if desired. The one difference between this original set of files and the released version of Xargon is that Episode 1 contains the Level Editor enabled version of the executable (XRFILE01.EXE).
How to Run Xargon in Edit Mode
- Open the Xargon Edit Version software.
- I recommend using D-Fend Reloaded which is a graphical environment for DOSBox.
- Run C:\Games\Xargon Edit Version\XARGON.BAT. You can choose any folder name that you want to copy the game to.
- Run to play Xargon as written: C:\Games\Xargon Edit Version\Original Files\XARGON.BAT.
- Start Episode 1: Beyond Reality.
- This is currently the only Episode that will allow you to edit its levels.
- I am looking into what it may require to enable the level editor in Xargon Episodes 2 and 3 and this functionality may come at a later date.
- In the meantime, it “is” possible to open and edit levels from Episode 2 and 3 by manually renaming the relevant level file in the game directory from *.XR2 or *.XR3 to *.XR1, which will allow the Episode 1 level editor to open it. However, due to some differences between tiles and objects between the three episodes, editing an Episode 2 or 3 level with the Episode 1 level editor may not provide you with every tile or object you would ordinarily expect to find in that level, and you might encounter some gameplay glitches when testing it.
- From the game's main menu screen, press Ctrl+E to enter the edit mode.
Loading a Level (aka Board)
- Press the letter 'L'
- Enter the name of the level you want to edit and press <ENTER>.
- I made copies of each level with a simpler number scheme, so they are easier to Load and Save. For example, BOARD_01 is simply 01.
- Information on each Level. Here are some examples of what you might see.
- Memory Used: 112016
- Number of Objects (# OBJS): 139
- Levels/boards are used not only for playable levels, but also for things like the map screen, background graphics for the main menu, and story line screens.
Saving a Level (aka Board)
- Press the letter 'S' and enter the name of your level.
- You can name the level whatever you want provided it is 8 characters or less. I originally named them 1.XR1, 2.XR1, etc. to make it easier to switch between them during creation.
- The XR1 extension will automatically be added.
- I recommend that you Save frequently. There are times when editing can cause it to lock up and you don't want to lose all your hard work.
Adding Tiles for Level Graphics (aka Blocks)
- Use the arrow keys to move to the location where you want to place the tile.
- Press <ENTER>.
- Enter the name of the tile and press <ENTER> again. (A list of tile names is provided below.)
- Repeat the last tile to every space you move your cursor by pressing the <TAB> key.
- If you want to place the same tile you already placed, move the cursor to the new location and press the <SPACE BAR> as it remembers the last tile.
- Move quickly around the screen by holding the <SHIFT> key and then pressing one of the <ARROW> keys.
- Remove a tile by adding 0no (that's a zero and then the word 'no').
- Level graphic tiles will already have the properties you expect of them from playing the game without any additional configuration necessary. For instance, simply placing the climbing rope tiles in the level will result in a climbable rope. Similarly, placing lava or water tiles in a level will automatically result in dangerous lava or water that can kill the player.
Copy Large Portions of Tiles
- Move cursor to the top left corner of the area you want to copy and press F1.
- Move cursor to the bottom right corner of the area you want to copy and press F2.
- Move cursor to the tile where you want to paste it and press F3.
- Tips for rapid level creation.
- Create a section and then copy it multiple times. Replace various tiles to randomize the look and feel.
- Copy a section from an existing level. Switch to your level and paste it in there. Modify as desired. This can be very useful for quickly adding large complex background scenery or other large graphics that are made up of multiple tiles adjacent to each other.
Managing Objects
- Objects include items that interact with the player, such as enemies, powerups, keys, and bonus items. Placing the appropriate object is also how you will initiate certain player actions, such as transforming into a bee or entering the submersible pod during a level.
- Object Offset (aka Dis Y) the cursor - Press the letter 'Y' and enter the number of units to offset an object.
- This is used to line up objects, so they are not floating in the air. For example, the Robot requires an offset of 4 for it to sit on the ground.
- Most bonus objects have an offset of zero.
- You will also need to find the offset number to delete or modify an object.
- Example of how this works.
- New Object: Set the offset number (Dis Y) to 4. Select Object and then ADD to type in Robot. It will now be lined up properly.
- Existing Object: Move the cursor to the location of the object. Press Object and then KOPY. Press 'Y' to set the offset to 4. Now press Object and then OOV. It will move the object to the new offset.
- *IMPORTANT* Make sure that you put this back to zero after placing your object unless you plan on placing more of the same object.
-
Press the letter 'O' and this screen will pop up.
The remainder of these assume you've already pressed 'O' to bring up this menu.
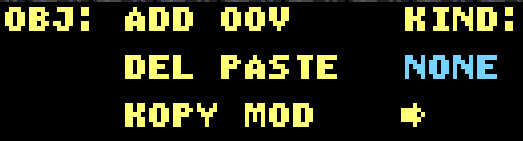
- ADD an Object - Press the letter 'A'. Use the <ENTER> key to move through options.
- Refer to the "Definitions for Objects" section to see the available objects you can use in your level.
-
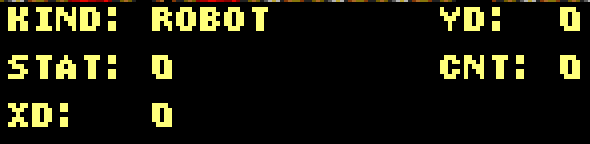
For example, press 'O' to bring up the Object menu, then 'A' to Add an object, and type "Robot" in the KIND field. You can press <ENTER> repeatedly until it is added. I'll explain the other fields in this document.
- MOVE object to current location - Press the letter 'O'.
- For example, highlight the key and press 'O' and then 'K'. Now move to the new location for the key. You can also set the Offset (Dis Y) to something different. Press 'O' and then 'O' again.
- IMPORTANT* - You must select KOPY on an object first or it will move the player to the new location.
- DELETE an Object - Press the letter 'D'.
- PASTE an Object that is in memory - Press the letter 'P'.
- COPY an Object - Press the letter 'K'.
- MODIFY an Object - Press the letter 'M'.
Other Commands and Tips
- Press the letter 'C' to change the COLOR of the sky. The Color list is at the end with the resources.
- Use your own music.
- Xargon uses CMF music files. There are certain third-party utilities that allow for conversion of MIDIs and other similar music file formats into CMFs.
- You can easily change Xargon’s music by renaming files in the game directory. For example, you can replace SONG_1.XR1 in the game directory with your own CMF file that you have named SONG_1.XR1. It will then play your replacement CMF file when the first level loads.
- Clear the entire level by pressing the letter 'Z' and then typing the letter 'Y' (case insensitive).
- Bring up the High Score during editing by pressing the 'I' key.
- The purpose is to add text in the HIGH SCORES with a score of 1000.
- I suggest avoiding it as the only way to remove it is to move the cursor over every piece of it.
Playing Your Level
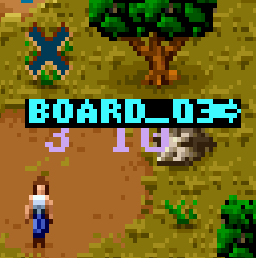
- Modify the Checkpoint I created on the Map Level where Malvineous enters. This is my preferred method, especially for testing.
- The 'X' is an object and can be moved out of the way by using the Object Move command.
-
The '3' and the '10' in my example will load specific levels. These are invisible when you play the game. That is the reason for the 'X' over the top of them.

-
Move your cursor to the number '3'. Press Object and then MOD (for modify). Press <ENTER> until you arrive at CNT. This is the official level number that you want to play. Things like level messages are built into the game and can't be changed at this time.

-
Press <ENTER> to edit TEXT INSIDE. This is where you will type the name of your level/board. It can be any name up to eight characters. For example, I have a TEST level that I simply named 'T.' If I wanted it to load here, I would type 'T' instead of "BOARD_03."
- Playing your level in place of one that already exists in the game. This is assuming that you are not changing the Map level. This is more for final changes rather than testing.
- From Windows File Explorer, or any other method you prefer, rename the Board to match the name it is expecting.
- You will need to rename the original board unless it is the one you edited and saved.
- For example, if you just edited 05.XR1 but want it to be the first level, rename BOARD_01.XR1 to something like BOARD_01 (Original).XR1. Then rename 05.XR1 to BOARD_01.XR1.
- You can also edit the checkpoints on the Map to reflect your names. That will save you the hassle of all the renaming of files.
- There is currently no way to automatically play the level you are editing. I use option one above for my testing.
Level/Board Names
| INTRO | I have modified this one for this special version, but you can always get the original from the subfolder. |
| STORY | Create a new story. Better yet, expand on the current story. |
| MAP | This is where the Tiny Malvineous walks around to get to various levels. |
| DEMO1 | |
| DEMO2 | |
| DEMO3 | |
| BOARD_01 | Malvineous returns to the safety of the map level. |
| BOARD_02 | Malvineous begins his journey in this bizarre world. |
| BOARD_03 | Malvineous enters a strange new dimension. |
| BOARD_04 | Malvineous enters the forest of enchanted trees. |
| BOARD_05 | Malvineous discovers a robot development plant. |
| BOARD_06 | Malvineous falls into the corridors of doom. |
| BOARD_07 | Malvineous ventures into the cave of the ancients. |
| BOARD_08 | Malvineous gets lost in the mysterious corkscrew cave. |
| BOARD_09 | Malvineous plunges into the chilly waters of the coral grave. |
| BOARD_10 | Malvineous faces certain death in the tunnels of terror. |
| BOARD_32 | Malvineous stumbles into Xargon's secret factory. |
| BOARD_33 | Ending Sequence. |
Each of the boards have a duplicate for editing that is simply named 01, 02, etc.
Colors (used for the Sky or Background)
Effects such as the lightning flash effect are controlled by the code. The colors for the levels are hard coded into the game. The Effects object appears to control some of these settings. For example, if you want the sky to be yellow.
- Add the Object called Effects.
- Set STAT=4 and YD=1
- Use the tile SK1 for solid sky.
There are settings that control whether there is lightning on the level and whether the waterfalls, lava, and acid are animated.
More details to come…
0 = Black
1 = Default Color
2 = Dark Blue
3 = Light Blue
4 = Yellow
5 = Light Green
6 = Brown
7 = Violet
8 = Gray
9 = Bright Blue
Tile (Block) Names
There are many different tiles that can be used to create interesting levels. This document will be updated over time.
Note: You will notice that there are gaps in the numbers. Those represent tiles that were rejected for the final project and were removed to save space.
| Number | Name | Description/Hint |
|---|---|---|
| 1 | sk1 | Sky background |
| 2 | sk2 | |
| 3 | sk3 | |
| 4 | sk4 | |
| 5 | sk5 | |
| 6 | cld1 | Cloud |
| 7 | vl | Grass scenery |
| 8 | vr | |
| 9 | s1l | Beige platform |
| 10 | s1r | |
| 11 | cld2 | Cloud |
| 12 | cld3 | |
| 13 | r1 | |
| 14 | r2 | |
| 15 | r3 | |
| 16 | r4 | |
| 17 | gs1 | Grass scenery |
| 18 | gs2 | |
| 19 | r5 | |
| 20 | r6 | |
| 21 | s2 | |
| 22 | s2c | |
| 23 | s2m | |
| 24 | s2b | |
| 25 | s2u | |
| 26 | s2bk | |
| 27 | cld4 | Cloud |
| 28 | cld5 | |
| 29 | cld6 | |
| 32 | tr1 | Tree |
| 33 | tr2 | |
| 34 | tr3 | |
| 35 | tr4 | |
| 36 | tr5 | |
| 37 | tr6 | |
| 38 | tr7 | |
| 39 | tr8 | |
| 40 | tr9 | |
| 41 | tra | |
| 42 | trb | |
| 43 | trc | |
| 44 | trd | |
| 45 | tre | |
| 46 | trf | |
| 47 | trg | |
| 48 | trh | |
| 49 | tri | |
| 50 | trj | |
| 51 | trk | |
| 52 | trl | |
| 53 | trm | |
| 54 | trn | |
| 55 | tro | |
| 56 | trp | |
| 57 | trq | |
| 58 | trr | |
| 59 | trs | |
| 60 | pilt | Blue Pillar Top |
| 61 | pilb | Blue Pillar Bottom |
| 63 | c1 | Stone Bricks (BG) |
| 64 | s3 | Stone Bricks (BG) |
| 65 | c2 | Stone Bricks (BG) |
| 66 | c3 | Stone Bricks (BG) |
| 67 | c4 | Stone Bricks (BG) |
| 68 | c5 | Stone Bricks (BG) |
| 69 | c6 | Stone Bricks (BG) |
| 70 | c7 | Stone Bricks (BG) |
| 78 | xrp1 | Climbing Rope (Climbable) |
| 79 | xrp2 | |
| 80 | xrp3 | |
| 81 | xg1 | Grass and dirt platform |
| 82 | xg2 | |
| 83 | xg3 | |
| 84 | xg4 | |
| 85 | xg5 | |
| 86 | xg6 | |
| 87 | xg7 | |
| 88 | xg8 | |
| 89 | xg9 | |
| 90 | xga | |
| 91 | xgb | |
| 92 | xgc | |
| 93 | xgd | |
| 94 | xp1 | Plant |
| 95 | xp2 | |
| 96 | xp3 | |
| 97 | xp4 | |
| 98 | xp5 | |
| 99 | xp6 | |
| 100 | xp7 | |
| 101 | xp8 | |
| 102 | xp9 | |
| 103 | xpa | |
| 104 | d1 | |
| 105 | d2 | |
| 107 | d3 | |
| 109 | coilt | Coil Top (BG) |
| 110 | coilb | Coil Bottom (BG) |
| 111 | ch1 | Chain (Climbable) |
| 112 | ch2 | Chain (Climbable) |
| 113 | ch3 | Chain (Climbable) |
| 114 | ch4 | Chain (Climbable) |
| 115 | d4 | |
| 116 | d5 | |
| 117 | c8 | |
| 118 | d6 | |
| 119 | d7 | |
| 120 | d8 | |
| 126 | wl1 | Purple Background (BG) |
| 132 | wl2 | Purple Background (BG) |
| 133 | wl3 | Purple Background (BG) |
| 134 | wlshd1 | |
| 135 | wlshd2 | |
| 136 | wlshd3 | |
| 137 | s7 | Tan Ground on Stone (Solid) |
| 138 | stlbeam | Steel beam |
| 139 | elevl | Elevator platform |
| 140 | elevr | |
| 141 | elevbotl | |
| 142 | elevbotr | |
| 143 | wl4 | Stone Block (Solid) |
| 146 | platl | Horizontally moving platform |
| 147 | platr | |
| 148 | breakwall | |
| 149 | arrow1 | Wall-based arrow launcher |
| 150 | arrow2 | |
| 151 | motion1 | |
| 155 | xge | Grass and dirt platform |
| 156 | xgf | |
| 157 | xgg | |
| 158 | xhk | |
| 160 | crum1 | |
| 161 | crum2 | |
| 162 | crum3 | |
| 163 | crum4 | |
| 164 | crum5 | |
| 165 | crum6 | |
| 166 | crum7 | |
| 167 | crum8 | |
| 168 | crum9 | |
| 169 | cruma | |
| 170 | crumb | |
| 171 | crum_last | |
| 172 | blink | |
| 173 | 0no | |
| 174 | rnsldgm | Ruins Platform Middle (Solid) |
| 175 | rnsldgl | Ruins Platform Left (Solid) |
| 176 | rnsldgr | Ruins Platform Right (Solid) |
| 177 | rnstl | Ruins Block (BG) |
| 178 | rnstm | Ruins Block (BG) |
| 179 | rnstcrk | Ruins Block (Solid) |
| 180 | rnstr | |
| 181 | rns1 | |
| 182 | rns2 | |
| 183 | rns3l | |
| 184 | rns3r | |
| 185 | ctop | Another stone platform |
| 186 | cmid | |
| 187 | cbot | |
| 188 | ccrk | |
| 189 | epic1 | Epic logo |
| 190 | epic2 | |
| 191 | epic3 | |
| 192 | cgem | |
| 193 | rns4l | |
| 194 | rns4r | |
| 195 | rns5l | |
| 196 | rns5r | |
| 197 | rnsshdl | |
| 198 | rnsshdr | |
| 199 | rnso6 | |
| 200 | rns6 | |
| 201 | rnso7l | |
| 202 | rnso7r | |
| 203 | rns7l | |
| 204 | rns7r | |
| 205 | rnso8l | |
| 206 | rnso8r | |
| 207 | rns8l | |
| 208 | rns8r | |
| 209 | rnso9 | |
| 210 | rns9 | |
| 211 | drt1 | Dirt (Solid) |
| 212 | drt2 | Dirt (Solid) |
| 213 | drt3 | Dirt (Solid) |
| 214 | drt4 | Dirt (Solid) |
| 215 | drtbl | Dirt Bottom Left |
| 216 | drtbr | Dirt Bottom Right |
| 217 | stldr1 | Steel door (for key to open) |
| 218 | stldr2 | |
| 219 | stldr3 | |
| 220 | bridge | Bridge |
| 221 | stalagt | Stalactites and stalagmites |
| 222 | stalagm | |
| 223 | stalagb | |
| 224 | cvitr | Ground blocks for cave |
| 225 | cvpeb1 | |
| 226 | cvmid | |
| 227 | cv0 | |
| 228 | cvpeb2 | |
| 229 | cvcrk1 | |
| 230 | cv1 | |
| 231 | cvcrk2 | |
| 232 | cvb | |
| 233 | cvl | |
| 234 | cvr | |
| 235 | cvitl | |
| 236 | cvbr | |
| 237 | cvbl | |
| 238 | cvtr | |
| 239 | cvtl | |
| 240 | cvt | Top platform for Cave ground |
| 241 | cvcrk3 | |
| 242 | 2weed | Weed (cave scenery) |
| 243 | 2rk1 | Rocks (cave scenery) |
| 244 | 2rk2 | |
| 245 | grs1 | |
| 246 | grs2 | |
| 247 | bmsh | Mushroom (cave scenery) |
| 248 | bmsht | |
| 249 | bmshb | |
| 250 | post | Post |
| 251 | rnsocl | |
| 252 | rnsocr | |
| 253 | rnscl | |
| 254 | rnscr | |
| 255 | rnsct | |
| 256 | rnscb | |
| 257 | rnsocb2 | |
| 258 | sign1 | X sign (bg scenery) |
| 259 | rnscb2 | |
| 260 | comp1 | |
| 261 | comp2 | |
| 262 | comp3 | |
| 263 | eyeop | Eye (bg scenery) |
| 264 | eyecl | |
| 265 | noeye | |
| 266 | rnscm | Stone ruins style column |
| 267 | rnscm2 | |
| 268 | s_skull | Skull sign (bg scenery) |
| 269 | s_quest | |
| 270 | s_red | |
| 271 | s_gray | |
| 272 | arl | Arrows to give directions to player (bg scenery) |
| 273 | arr | |
| 274 | aru | |
| 275 | ard | |
| 276 | arul | |
| 277 | arur | |
| 278 | ardl | |
| 279 | ardr | |
| 280 | rnscm3 | Stone ruins style column |
| 281 | rnscshd | |
| 282 | rnscshd2 | |
| 283 | rnscot2 | |
| 284 | rnsct2 | |
| 285 | rnsgmb | Ruins Block (BG) |
| 286 | rnsgmr | Ruins Block (BG) |
| 287 | rnstgm | Ruins Block (Solid) |
| 290 | lava1 | Lava |
| 291 | lava2 | |
| 292 | lava3 | |
| 293 | lava4 | |
| 294 | lava5 | |
| 295 | lava6 | |
| 296 | lava7 | |
| 297 | lava8 | |
| 298 | lavab | |
| 301 | invisible | |
| 302 | stn1 | |
| 303 | stn2 | |
| 304 | stn3 | |
| 305 | s5l | |
| 306 | s5r | |
| 307 | beam1 | Beam |
| 308 | beam2 | |
| 309 | ypipe1 | |
| 310 | ypipe2 | |
| 311 | ypipe3 | |
| 312 | ypipe4 | |
| 313 | ywl1 | |
| 314 | ywl2 | |
| 315 | ywl3 | |
| 316 | ywl4 | |
| 317 | ywl5 | |
| 318 | ywl6 | |
| 319 | ywl7 | |
| 320 | ywl8 | |
| 321 | ywl9 | |
| 322 | ywla | |
| 323 | yshd1 | |
| 324 | yshd2 | |
| 325 | yshd3 | |
| 326 | yshd4 | |
| 327 | yshd5 | |
| 328 | yshd6 | |
| 329 | ywlb | |
| 330 | ywlc | |
| 331 | yshd7 | |
| 332 | yshd8 | |
| 333 | yg1 | |
| 334 | yg2 | |
| 335 | gry1 | |
| 336 | gry2 | |
| 337 | gry3 | |
| 338 | gry4 | |
| 339 | gry5 | |
| 340 | red1 | |
| 341 | red2 | |
| 342 | red3 | |
| 343 | red4 | |
| 344 | red5 | |
| 345 | red6 | |
| 346 | blue1 | |
| 349 | s9l | |
| 350 | s9m1 | |
| 351 | s9m2 | |
| 352 | s9r | |
| 353 | cvg1 | Grass hanging from cave ceiling |
| 354 | cvg2 | |
| 355 | cvibr | Stone ground used in cave |
| 356 | cvibl | |
| 360 | coralshl | Coral ground used in underwater levels |
| 361 | coralshd | |
| 362 | coralt | |
| 363 | coralt2 | |
| 364 | waterfl1 | Waterfall |
| 365 | waterfl2 | |
| 366 | waterfl3 | |
| 367 | waterfl4 | |
| 368 | water0 | |
| 369 | waterfls1 | |
| 370 | waterfls2 | |
| 371 | waterflt | |
| 372 | coralbl | |
| 373 | coralbr | |
| 374 | algaeb | |
| 375 | waterbubl | Water bubbles |
| 376 | watert1 | Top of water with waves |
| 377 | watert2 | |
| 378 | watert3 | |
| 379 | watert4 | |
| 380 | watert5 | |
| 381 | watert6 | |
| 382 | watert7 | |
| 383 | watert8 | |
| 384 | seaweedr | Seaweed (underwater scenery) |
| 385 | seaweedl | |
| 386 | coralvegl | |
| 387 | coralvegr | |
| 388 | coraltl | |
| 389 | coralm | |
| 390 | coraltr | |
| 391 | waterbr | |
| 392 | waterbl | |
| 393 | algae1 | Algae (underwater scenery) |
| 394 | algae2 | |
| 395 | algae3 | |
| 396 | algae4 | |
| 397 | coralm2 | Mussels (bg scenery used amongst coral) |
| 398 | coralm3 | |
| 399 | mpbrdg2 | Bridge used on map |
| 400 | mpswmp1 | Swamp graphics used on map |
| 401 | mpswmp2 | |
| 402 | mpswmp3 | |
| 403 | mpswmp4 | |
| 404 | mprkl | Rock used on map |
| 405 | mprkr | |
| 406 | mprk | |
| 407 | mprk2l | |
| 408 | mprk2r | |
| 409 | mprk2 | |
| 412 | leaf1 | Leaves used with tree blocks |
| 413 | leaf2 | |
| 414 | leaf3 | |
| 415 | leaf4 | |
| 416 | leaf5 | |
| 417 | leaf6 | |
| 418 | leaf7 | |
| 419 | leaf8 | |
| 420 | leaf9 | |
| 421 | leafa | |
| 422 | brnch1 | Tree branch (black bg) |
| 423 | brnch2 | |
| 424 | brnch3 | |
| 425 | brnch4 | |
| 426 | trnk1 | Tree trunk (black bg) |
| 427 | trnk2 | |
| 428 | trbs1 | Shrubs (scenery) (black bg) |
| 429 | trbs2 | |
| 430 | trbs3 | |
| 431 | weed | Weed (scenery) (black bg) |
| 432 | rflr1 | Red flower (scenery) (black bg) |
| 433 | rflr2 | |
| 434 | yflr1 | Yellow flower (scenery) (black bg) |
| 435 | yflr2 | |
| 436 | srk1 | Stone scenery with stone background |
| 437 | srk2 | |
| 438 | shrb1 | Shrubs (scenery) (black bg) |
| 439 | shrb2 | |
| 440 | shrb3 | |
| 441 | shrb4 | |
| 442 | shrb5 | |
| 443 | shrb6 | |
| 444 | shrb7 | |
| 445 | shrb8 | |
| 446 | shrb9 | |
| 447 | shrba | |
| 448 | shrbb | |
| 449 | ldg1 | Ledge (grass over stone platform) |
| 450 | ldg2 | |
| 451 | ldgnd1 | |
| 452 | ldgnd2 | |
| 453 | stnwl1 | Stone style wall blocks |
| 454 | stnwl2 | |
| 455 | stnwl3 | |
| 456 | stnwl4 | |
| 457 | stnwl5 | |
| 458 | stnwl6 | |
| 459 | stnwl7 | |
| 460 | stnwl8 | |
| 461 | stnwl9 | |
| 462 | stnu1 | |
| 463 | stnu2 | |
| 464 | stnu3 | |
| 465 | stnu4 | |
| 466 | stnu5 | |
| 467 | stnu6 | |
| 468 | stnu7 | |
| 469 | stnu8 | |
| 470 | stnu9 | |
| 471 | stnua | |
| 472 | stnwla | |
| 473 | stnwlb | |
| 476 | shd1 | |
| 477 | shd2 | |
| 478 | stnwlc | |
| 479 | stnwld | |
| 480 | shd3 | |
| 481 | rk1 | Rock (scenery with stone background) |
| 482 | rk2 | |
| 483 | rk3 | |
| 484 | rk4 | |
| 485 | rk5 | |
| 486 | rk6 | |
| 487 | rk7 | |
| 488 | rk8 | |
| 489 | stng1 | Stone w/grass (scenery with stone background) |
| 490 | stng2 | |
| 491 | stng3 | |
| 492 | smush | Mushroom (scenery with stone background) |
| 493 | mush1 | |
| 494 | mush2 | |
| 495 | stnshrb1 | Shrub (scenery with stone background) |
| 496 | stnshrb2 | |
| 497 | stnshrb3 | |
| 498 | stnshrb4 | |
| 499 | stnweed | Weed (scenery with stone background) |
| 500 | u1 | Fire breathing background enemy |
| 503 | u2 | |
| 504 | u3 | |
| 505 | u4 | |
| 506 | u5 | |
| 507 | u6 | |
| 508 | u7 | |
| 509 | u8 | |
| 510 | u9 | |
| 511 | ua | |
| 513 | ub | |
| 514 | uc | |
| 515 | sprk1 | |
| 516 | sprk2 | |
| 517 | sprk3 | |
| 518 | sprk4 | |
| 519 | bnlcon | Green leaves/stem for a plant |
| 520 | bnlstm | |
| 521 | bnllf | |
| 522 | bnrcon | |
| 523 | bnrstm | |
| 524 | bnrlf | |
| 525 | bnm | |
| 526 | bnl | |
| 527 | bnr | |
| 528 | acid1 | Acid used in factory |
| 529 | acid2 | |
| 530 | acid3 | |
| 531 | acid4 | |
| 532 | acid5 | |
| 533 | acid6 | |
| 534 | acid7 | |
| 535 | acid8 | |
| 536 | acidb | |
| 544 | rkr | Rock tiles used for rock cave/mountain level |
| 545 | rkm2 | |
| 546 | rkm3 | |
| 549 | thrnt | Thorn/spikes used in rock cave |
| 550 | thrnb | |
| 551 | rkm | |
| 552 | rkbk1 | |
| 553 | rkbk2 | |
| 554 | rkbk3 | |
| 555 | rkldgl | Rock ground platform for rock cave |
| 556 | rkldgm | |
| 557 | rkldgr | |
| 558 | rkb1 | |
| 559 | rkb2 | |
| 560 | rkibl | |
| 561 | rkibr | |
| 562 | rkshd | Thorn/spikes used in rock cave |
| 563 | thornt | |
| 564 | thornb | |
| 565 | rklshd | |
| 566 | rkbkl | |
| 567 | rkrshd | More rock tiles used in rock cave |
| 568 | rkbkr | |
| 569 | rkldgl2 | |
| 570 | rkobl | |
| 571 | rkldgr2 | |
| 572 | rkobr | |
| 573 | rkl | |
| 574 | waterend1 | Water with rock background |
| 575 | waterend2 | |
| 576 | waterend3 | |
| 577 | waterend4 | |
| 578 | waterend5 | |
| 579 | waterend6 | |
| 580 | waterend7 | |
| 581 | waterend8 | |
| 582 | watermst1 | Waterfall entering top of water |
| 583 | watermst2 | |
| 584 | watermst3 | |
| 585 | watermst4 | |
| 586 | watermst5 | |
| 587 | watermst6 | |
| 588 | watermst7 | |
| 589 | watermst8 | |
| 590 | waterwav1 | Water wave/ripples |
| 591 | waterwav2 | |
| 592 | waterwav3 | |
| 593 | waterwav4 | |
| 594 | waterwav5 | |
| 595 | waterwav6 | |
| 596 | waterwav7 | |
| 597 | waterwav8 | |
| 598 | spike1 | Spikes (black bg) |
| 599 | spike2 | |
| 600 | spike3 | |
| 601 | spike4 | |
| 602 | spike5 | |
| 603 | spike6 | |
| 604 | lavark1 | |
| 605 | lavark2 | |
| 606 | lavaflw1 | Lava in volcano level |
| 607 | lavaflw2 | |
| 608 | lavaflw3 | |
| 609 | lavaflw4 | |
| 610 | vine1 | Leafy vine to climb |
| 611 | vine2 | |
| 612 | vine3 | |
| 613 | vine4 | |
| 614 | vine5 | |
| 615 | vine6 | |
| 616 | flow1 | Pipes with green acid (factory stage scenery) |
| 617 | flow2 | |
| 618 | flow3 | |
| 619 | pb | Pipes with green acid (factory stage scenery) |
| 620 | pt | |
| 621 | pm1 | |
| 622 | pmdrp | |
| 623 | ptdrp | |
| 624 | vent | |
| 629 | cube1 | Cube blocks used in factory stage |
| 630 | cube2 | |
| 631 | pl | Horizontal pipes (factory stage scenery) |
| 632 | pr | |
| 633 | pc | |
| 634 | pmft | Additional pipes (factory stage scenery) |
| 635 | pcon | |
| 636 | pmbk | |
| 637 | pmr | |
| 638 | pmlk | |
| 639 | pm2 | |
| 640 | pm3 | |
| 641 | fcbl | Factory background scenery |
| 642 | fcl | |
| 643 | fctl | |
| 644 | fcr | |
| 645 | fctr | |
| 646 | fcbr | |
| 647 | fcb | |
| 648 | fct | |
| 649 | lever1 | |
| 650 | lever2 | |
| 651 | lever3 | |
| 652 | lever4 | |
| 653 | lever5 | |
| 654 | lever6 | |
| 655 | lever7 | |
| 656 | drive | Next several items are more factory background scenery |
| 657 | redx | |
| 658 | orb | |
| 659 | gobk | |
| 660 | fc1 | |
| 661 | fc2 | |
| 662 | vent2 | |
| 663 | fc3 | |
| 664 | fc4 | |
| 665 | fc5 | |
| 666 | alien_q | |
| 667 | alien_e | |
| 668 | alien_p | |
| 669 | alien_i | |
| 670 | alien_c | |
| 671 | pml | |
| 672 | pmrd | |
| 673 | pmld | |
| 674 | capb | |
| 675 | capt | |
| 676 | elec1 | Grates (factory bg scenery) |
| 677 | elec2 | |
| 678 | elec3 | |
| 679 | elec4 | |
| 680 | elec5 | |
| 681 | elec6 | |
| 682 | elec7 | |
| 683 | elec8 | |
| 684 | elec9 | |
| 685 | pmshd | |
| 686 | fcshd1 | |
| 687 | fcshd2 | |
| 688 | pbig | |
| 689 | psml | |
| 690 | pmr2 | |
| 691 | pml2 | |
| 692 | pmrd2 | |
| 693 | pmld2 | |
| 700 | mpfld | Map dirt paths |
| 701 | mphor | |
| 702 | mpver | |
| 703 | mptl | |
| 704 | mptm | |
| 705 | mptr | |
| 706 | mpl | |
| 707 | mpm | |
| 708 | mpr | |
| 709 | mpbl | |
| 710 | mpbm | |
| 711 | mpbr | |
| 712 | mpg1 | Map grass |
| 713 | mpg2 | |
| 714 | mptr1 | Map trees |
| 715 | mptr2 | |
| 716 | mptr3 | |
| 717 | mptr4 | |
| 718 | mpgttl | |
| 719 | mpgttr | |
| 720 | mpgate | Map locked gate |
| 721 | mpgtl | Map stone wall |
| 722 | mpgtr | |
| 723 | mpwl | |
| 724 | mpwlc | |
| 725 | mpwll2 | |
| 726 | mpwl2shd | |
| 727 | mpwlshd | |
| 728 | mpcv1 | Map cave opening |
| 729 | mpcv2 | |
| 730 | mpcv3 | |
| 731 | mpcv4 | |
| 732 | mpcv5 | |
| 733 | mpcv6 | |
| 734 | s6l | |
| 735 | s6r | |
| 736 | grsl | Grass that goes over dirt blocks (level 3) |
| 737 | grsr | |
| 738 | drtul | Dirt (level 3 ground) |
| 739 | drtur | |
| 740 | drtl1 | |
| 741 | drtr1 | |
| 742 | drtl2 | |
| 743 | drtr2 | |
| 744 | drtb1 | |
| 745 | drtb2 | |
| 746 | rt1 | Roots suspended in air (black bg) |
| 747 | rt2 | |
| 748 | drtb3 | |
| 749 | rt3 | |
| 750 | drtrt1 | Roots (scenery within dirt blocks) |
| 751 | drtrt2 | |
| 752 | drtrt3 | |
| 753 | drtrt4 | |
| 754 | limb1 | Tree limb bridge (level 3) |
| 755 | limb2 | |
| 756 | drtl1b | |
| 757 | drtr1b | |
| 758 | drt4b | |
| 759 | s8m | |
| 760 | s8l | |
| 761 | s8r | |
| 762 | rdbl | |
| 763 | rdbr | |
| 764 | rdm | |
| 765 | rdm2 | |
| 766 | rdl1 | |
| 767 | rdl2 | |
| 768 | rdr1 | |
| 769 | rdr2 | |
| 770 | rdm3 | |
| 771 | rdm4 | |
| 772 | rdm5 | |
| 773 | rdm6 | |
| 774 | rdb1 | |
| 775 | rdb2 | |
| 776 | rdtr1 | |
| 777 | rdtr2 | |
| 778 | rdtr3 | |
| 779 | rdtr4 | |
| 780 | rdtr5 | |
| 781 | rdtr6 | |
| 782 | rdtr7 | |
| 783 | rdtr8 | |
| 784 | cr1 | Large white crystals (scenery, black bg) |
| 785 | cr2 | |
| 786 | cr3 | |
| 787 | cr4 | |
| 788 | cr5 | |
| 789 | cr6 | |
| 790 | cr7 | |
| 791 | cr8 | |
| 792 | cr9 | |
| 793 | cra | |
| 794 | crb | |
| 795 | crc | |
| 796 | crd | |
| 797 | cre | |
| 798 | crf | |
| 799 | crg | |
| 800 | br | Grey Block (Solid) |
| 801 | brt | Grey Block Top (Solid) |
| 802 | brb | Grey Block Bottom (Solid) |
| 803 | brbl | Grey Block Left (Solid) |
| 804 | brbr | Grey Block Right (Solid) |
| 805 | brwl1 | |
| 806 | brwl2 | |
| 807 | brshd | |
| 808 | brwlbl | |
| 809 | brwlbr | |
| 810 | brwlg | |
| 811 | brwlb | |
| 812 | brrd | |
| 813 | brgrn | |
| 814 | br2 | |
| 815 | brdr1 | |
| 816 | brdr2 | |
| 817 | brdr3 | |
| 818 | brdr4 | |
| 819 | brdr5 | |
| 820 | brdr6 | |
| 821 | brs1l | |
| 822 | brs1r | |
| 823 | brs2l | |
| 824 | brs2r | |
| 825 | brbrdg1 | |
| 826 | brbrdg2 | |
| 827 | brwl3a | |
| 828 | brwl3b | |
| 829 | brwl3c | |
| 830 | brwl3d | |
| 831 | qbk | |
| 832 | qwin | |
| 833 | qst | |
| 834 | qsb | |
| 835 | qsshd | |
| 836 | qvntl | |
| 837 | qvntm | |
| 838 | qvntr | |
| 839 | qvnl | |
| 840 | qvnr | |
| 841 | qvnbl | |
| 842 | qvnbm | |
| 843 | qvnbr | |
| 844 | qorb | |
| 845 | qorbshd | |
| 846 | qp1 | |
| 847 | qp2 | |
| 848 | qp3 | |
| 849 | qp4 | |
| 850 | qp5 | |
| 851 | qp6 | |
| 852 | qzap1 | |
| 853 | qzap2 | |
| 854 | qzap3 | |
| 855 | htgsl | |
| 856 | htgsm1 | |
| 857 | htgsm2 | |
| 858 | htgsr | |
| 859 | htt | |
| 860 | htm | |
| 861 | htb | |
| 862 | htbrnch1 | |
| 863 | htbrnch2 | |
| 864 | htbmshd | |
| 865 | htbm1 | |
| 866 | htbm2 | |
| 867 | htbm3 | |
| 868 | htwll | |
| 869 | htwlr | |
| 870 | htwl | |
| 871 | htshd | |
| 872 | htrfm | |
| 873 | htrfl | |
| 874 | htrfr | |
| 875 | htrfbl | |
| 876 | htrfbr | |
| 877 | htrfbm | |
| 878 | htt1 | |
| 879 | htt2 | |
| 880 | mpwtl | Map blocks related to land meeting water |
| 881 | mpwtr | |
| 882 | mpwbl | |
| 883 | mpwbr | |
| 884 | mpwr1 | |
| 885 | mpwr2 | |
| 886 | mpwl1 | |
| 887 | mpwl2 | |
| 888 | mpwt1 | |
| 889 | mpwt2 | |
| 890 | mpwb1 | |
| 891 | mpwb2 | |
| 892 | mpwtlc | |
| 893 | mpwtrc | |
| 894 | mpwblc | |
| 895 | mpwbrc | |
| 896 | mpw0 | |
| 897 | mpbrdg1 | Map, horizontal bridge |
Object Configuration
KILLME – This is the default and will appear if an object name does not exist.
PLAYER OBJECTS – These are added via the code and not during editing.
PLAYER - Malvineous during gameplay
- Standing Dis Y=8 (Normal)
- Running Dis Y=11 (Intro)
TINY - Tiny Malvineous for map
HEROBEE - Malvineous turns into a bee
HEROSWIM - Malvineous gets into the S.U.P. (Submersible Underwater Pod)
LAND – ENEMIES
ALIEN – Dis Y=8
BAT
BEE
BITER – STAT=0 (facing right), STAT=1 (facing left)
BLOB – Dis Y=3
CENTIPEDE – Dis Y=10
CLIMBER
CREEPER
GHOUL
GRUNT – Dis Y=7
HOPPER
LEECH – Dis Y=-7
LIZARD
ROBOT – Dis Y=4
SKULL
SPIDER – Dis Y=8, XD=2 (facing right), XD=-3 (facing left)
TROLL
XARGBOT – STAT=2 for SUPER XARGBOT
XARGON
LAND – HARMFUL OBJECTS
| Type | CNT |
|---|---|
| Purple | 0 |
| Yellow | 1 |
| Gray | 2 |
| Spiked | 3 |
MASHER
POKER
SPEAR
SPIKES
| Type | YD | CNT |
|---|---|---|
| Ceiling (Down) | 1 | 1-22 (interval - lower means shorter and thus faster) |
| Floor (Up) | 0 | 1-22 (interval - lower means shorter and thus faster) |
STALAG
TURRET
WATER – ENEMIES
BADFISH
EEL
KRUSTY
REDFISH
SEAMONSTER
WATER – HARMFUL OBJECTS
MINE
HELPFUL OBJECTS
ADDSTEP – XD=type of step to add
BONUS| Type | STAT |
|---|---|
| ice cream | 0 |
| E (ring) | 1 (gives the player rapid fire) |
| Grapes | 2 |
| disk | 3 |
| green lollipop | 4 |
| red lollipop | 5 |
| cherries | 6 |
| pot of gold | 7 |
| strawberry | 8 |
| E (pool ball) | 9 (collect all 4 in the proper order and get a 4,000 point bonus!) |
| P (pool ball) | 10 |
| I (pool ball) | 11 |
| C (pool ball) | 12 |
| Journal | 13 |
| Orange | 14 |
| Baseball | 15 |
| eighth note | 16 |
| keyboard | 17 |
| E (block) | 18 |
| PC | 19 (2,000 points) |
| pink flower | 20 |
| yellow flower | 21 |
| red flower | 22 |
| star fish | 23 |
| treasure chest | 24 (SUPERSEDED with BOX) |
| blue box | 25 (SUPERSEDED with BOX) |
| yellow box | 26 (SUPERSEDED with BOX) |
| present | 27 (SUPERSEDED with BOX) |
| fireball | 28 (SUPERSEDED with BOX) (3 fireballs) |
BOX (STAT =items inside; XD=type of box; YD=-1 visible; CNT=trig#)
| Type | XD |
|---|---|
| Treasure Chest | 0 |
| Blue box | 1 |
| Yellow box | 2 |
| Present | 3 |
| Items inside | STAT |
|---|---|
| Hearts | 0 |
| Grapes | 1 |
| Cherries | 2 |
| Strawberry | 3 |
| Orange | 4 |
| Disk | 5 |
| Key0 (yellow) | 6 |
| Key1 (green) | 7 |
| Key2 (red) | 8 |
| Key3 (blue) | 9 |
| High Jump | 10 |
| Emerald | 11 |
| Fire | 12 |
BUTTON
CHECKPT
CLOUD – XD=1 (clouds you can stand on to get to higher places)
DOOR
| Type | STAT |
|---|---|
| Yellow | 0 |
| Green | 1 |
| Red | 2 |
| Blue | 3 |
EAGLE
ELEV
EMERALD
EPIC
GEMS
| Type | STAT |
|---|---|
| Green | 0 |
| Purple | 1 |
| Red | 2 |
| Yellow | 3 |
HEART
ICONS
| Type | STAT |
|---|---|
| Saber of King Arkul | 0 |
| Enchanted Sky Crystals | 1 |
| Dark Ring of Terror | 2 |
KEY
| Type | STAT |
|---|---|
| Yellow | 0 |
| Green | 1 |
| Red | 2 |
| Blue | 3 |
PAD – CNT=number to trig, STAT=-1 off, 0 trig, 1 on
| Type | YD | CNT |
|---|---|---|
| Change into Bee | 1 | 9 (use this in conjunction with Token – Magic Potion) |
| Enter S.U.P. | 0 | 98 (must cover entire opening when entering water) |
| Exit S.U.P. | 0 | 99 |
PLATFORM – YD=2, CNT=-1
SPRING – CNT=height
SWITCH – CNT=trig#, XD=0 onoff, 1=toggle
TOKEN – CNT=inv ref number
| Type | STAT | CNT |
|---|---|---|
| Crown | 0 | 98 (used when Malvineous exists S.U.P.) |
| Extra Laser Bullet | 4 | 0 |
| Magic Potion | 5 | 0 (this is used in conjunction with a pad to change into the bee.) |
| S.U.P. | 6 | 99 (used in conjunction with Pad when Malvineous enters the S.U.P.) |
| Rock to throw | 7 | 0 |
| Xibok Shoes | 8 | 0 |
AESTHETICS
FRONT (Items can walk behind these)| Type | STAT (object to walk behind) |
|---|---|
| Pillar Top | 0 |
| Pillar Middle | 1 |
| Pillar Bottom | 2 |
| Red Block | 3 |
| Exit Post | 4 |
| Tile s3 | 5 |
| Tile s7 | 6 (top used in level 10 for hidden area, to be used in conjunction with 12 below) |
| Weed | 7 |
| Mushroom | 8 |
| Map Tree 1 | 9 (allows tiny character to walk behind trees) |
| Map Tree 2 | 10 (allows tiny character to walk behind trees) |
| Exit Sign | 11 |
| Tile wl4 | 12 (wall used in level 10 for hidden area, to be used in conjunction with 6 above) |
| Reactor | 13 (actual reactor) |
| Unknown | 14 (invisible and not sure what it does) |
| <-TO | 15 |
| REACTOR | 16 (text pointing to reactor) |
MAP
| Type | STAT |
|---|---|
| Left side of volcano | 0 |
| Right side of volcano | 1 |
| Left side of mountain | 2 |
| Right side of mountain | 3 |
MAPDEMO – Dis Y=10, XD=1
SEAROCK
TEXT6 - You can type/modify text in Boards such as the story screens with this option and TEXT8 below. Here is an example.
| Type | Dis Y |
|---|---|
| Top | 8 |
| Middle | -2 |
| Bottom | 4 |
TEXT8
TORCH – CNT=0 (small flame), CNT=2 (medium), CNT=4 (large), CNT=6 (huge)
TXTMSG
GAME FUNCTIONS (not for use in game design)
ARROW
BUBBLE
BULLET
CENTEXPL
EFFECTS
FIRE
FIREBALL
FIREEXPL
FLASH
FRAGEXPL
HITHERO
HITWALL
LASER
PEBBLE
ROCK (this is different than the rock you collect)
SCORE
STORY1
STORY2
TIMERPAD
TORPEDO
TRANSPAD
TRANSPORT
BRIDGER – XD and YD=Direction (UNKNOWN - need to research)
ADVANCED CONFIGURATIONS
Enter S.U.P.Token – STAT=6 and CNT=99 (Set the upper left corner above the waterline one full tile.)
Pad – CNT=98
- Must cover entire opening when entering or the player will hit the water and die.
- It is recommended to put the first pad in the exact same location as the token.
Token – CNT=98
Pad – CNT=99
Change into Bee
Token – STAT=5
Pad – YD=1 and CNT=9
Turn back into Player from Bee
Token – CNT=98
Pad – CNT=0
